
Ben Eater has an amazing series on building an 8 bit computer that he posted on YouTube a few years ago. He has released the schematics and encourages everyone to build his computer. What I am building is a version of that computer. In this article I will demonstrate the 8 bit computer ALU or Arithmetic Logic Unit which can add and subtract integer numbers.
Before we get started lets me link to Ben Eater’s website. On his website you can find schematics, a parts list, a kit, and also watch his videos as well. The website is here but enough of the acknowledgements lets get started.
8 Bit Computer Components
One of the the challenges that I found was getting a hold of the components that Ben had. He used TTL components which are really old tech and really hard to get a hold off, so I used CMOS technology. The main difference between what he had and what I have is that the outputs do not have resistors built in for the set I had, you can get a set with built in resistors though. The second difference is that CMOS technology uses far less current than TTL making it possible to drive from an Arduino power supply safely.
One mistake I made was buying 300tie point breadboards instead of 650. This means my breadboards are half the size, the reason I bought them was because I got an amazing deal on high quality breadboards and it was cheaper for me to buy enough to duplicate it. One issue I did have is that the breadboards don’t stay connected, which drives me crazy.
I bought my parts from element14 in Australia and the total cost was about AU$300, which was cheaper than buying from Ben especially with added shipping.
List of Parts
The list of parts is below. I bought mine from Element14 but you can easily get it cheaper of AliExpress but Caveat Emptor on those shopping sites. There have been a lot of stories about fake parts and the like.
| Item # | Qty. ordered | Part # | Description |
|---|---|---|---|
| 1 | 30 | MCBB400. | BREADBOARD, SOLDERLESS |
| 2 | 5 | SN74HC00N | QUAD 2-INPUT NAND |
| 3 | 5 | SN74HC02N | QUAD 2-INPUT NOR |
| 4 | 5 | SN74HC08N | QUAD 2-INPUT AND |
| 5 | 5 | SN74HC32N | QUAD 2-INPUT OR |
| 6 | 5 | CD74HC107E | LOGIC, DUAL JK |
| 7 | 5 | SN74HC86N | QUAD 2-INPUT XOR |
| 8 | 5 | SN74HC138N | DECODER/DEMUX |
| 9 | 5 | SN74HC139N | DECODER/DEMUX |
| 10 | 5 | SN74HC157N | QUAD DATA CONVERTER |
| 11 | 5 | SN74HC161N | Counter / Multiplier / Divider Logic IC |
| 12 | 20 | CD74HC173E | , QUAD D-TYPE F-F |
| 13 | 4 | 71256SA20TPG | SRAM |
| 14 | 15 | CD74HC245E | LOGIC, OCT BUS |
| 15 | 5 | CD74HC283E | 4BIT BINARY FULL ADDER |
| 16 | 5 | CD74HC273E | OCT D-TYP FLIP-FLOP |
| 17 | 2 | AT28C64B-15PU | EEPROM PARALLEL |
| 18 | 5 | ADE0804 | SWITCH, DIL, 8WAY, SPS |
| 19 | 5 | 3362F-1-105LF | POT, TRIMMER |
| 20 | 5 | CD74HC04E | HEX INVERTER |
| 21 | 1 | – | Solid Core Wire |
| 22 | 1 | – | 100 pc LED KIT |
| 23 | 1 | – | 100pc Capacitor Kit |
| 24 | 1 | – | Resistors |
| 25 | 1 | – | Arduino Uno |
8 bit Computer ALU build
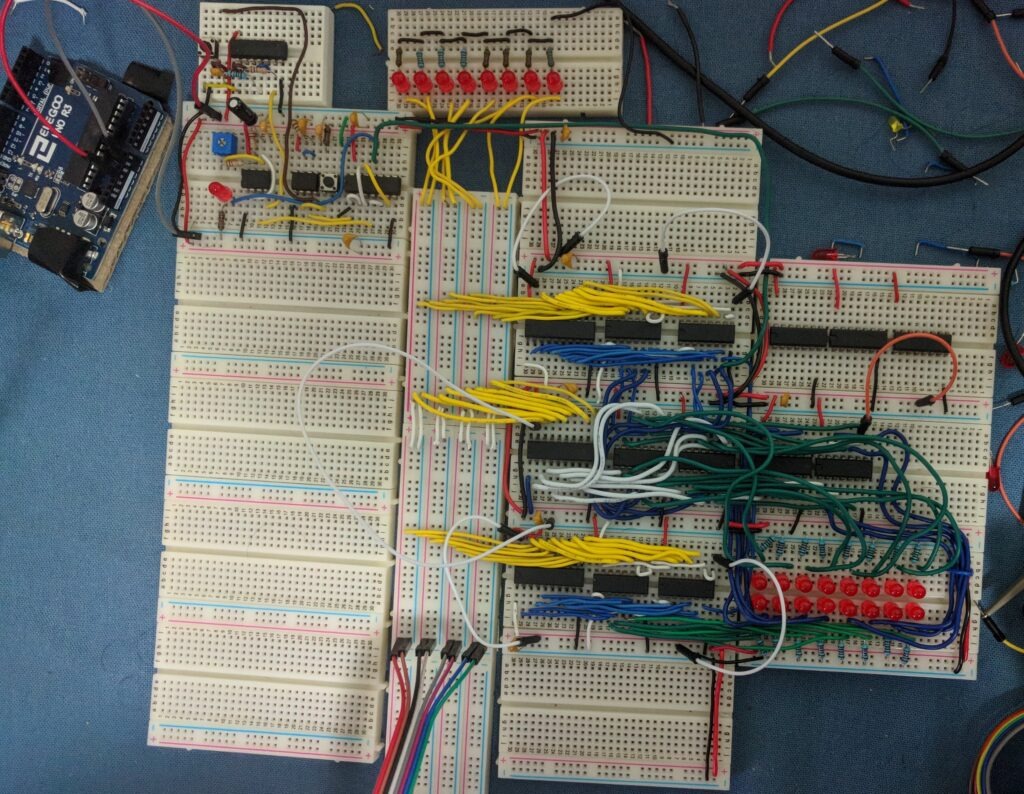
I didn’t make changes to Ben Eater’s design for the ALU I built as is, and moved around the LED placement a bit because I am using the small boards. Also not that my wiring is terrible and I bought the wrong size cables 22AWG is way to big, if I had another go I would use something like 18awg.
Here is a picture of the 8 bit Computer ALU, apart from the ALU it also contains the A and B registers that were part of the required build.
Does it Work?
To see if it works you’ll have to wait for an update so I get a YouTube video up to demonstrate it working!