This wordpress pages build guide requires you to have set up a child theme which can be found in this post. I’ve also decided that I need to adopt a project management methodology so I’ll be using agile.
The zeroth step is to build a user story and understand the requirements of what you want to do. What I want to do is:
Build a WordPress Pages template which will display posts by category which is indicated by the page title and sorted by sub category. The benefit will be an automated page of posts that is self updating and easy for the end user to use.
Use Case
The use case I have defined has 3 components.
- A page of posts sorted by sub-category
– This is how to get posts by category and sorted by sub category. - It needs to update automatically
– This will happen as a consequence if the first step is implemented as described. - The page needs to look nice
– I will use bootstrap to display rows and columns and change depending on device type
Step 1: Copy the header.php file into the child folder and edit it
By copying the header.php into the child theme you will be able to edit the header. This is important because you can add in the bootstrap files (JS and CSS files) into the html head tag. This will allow us to to use these files on future projects and all other pages.
cp ../minimalistblogger/header.php .Edit the header.php by adding in the following link and script tags into the head section inside the header.php file.
<link href="https://stackpath.bootstrapcdn.com/bootstrap/4.3.1/css/bootstrap.min.css" rel="stylesheet" integrity="sha384-ggOyR0iXCbMQv3Xipma34MD+dH/1fQ784/j6cY/iJTQUOhcWr7x9JvoRxT2MZw1T" crossorigin="anonymous">
<script src="https://stackpath.bootstrapcdn.com/bootstrap/4.3.1/js/bootstrap.min.js" integrity="sha384-JjSmVgyd0p3pXB1rRibZUAYoIIy6OrQ6VrjIEaFf/nJGzIxFDsf4x0xIM+B07jRM" crossorigin="anonymous"></script>
Step 2: Create a WordPress Pages template php file
Create a page-templates directory inside the minimalistblogger-child directory. Then inside of that directory create a file called custompage.php.
cd minimalistblogger-child
mkdir page-templates
cd page-templates
touch custompage.php
Step 3: Edit the page.php file
Add in the following code to the custompage.php file. This will allow the header and footer to be seen.
<?php /* Template Name: CustomPage Template
Template Post Type: post, page, event
*/
get_header();
?>

	<!--This is the page for the content-->

<?php
get_footer();
To see if you have done all of these steps correctly, create a post and select the chosen template and have a look. This will be available in the Page Attributes section.

Post Attributes Section
Step 4: WordPress Pages Header
I want the page header to be an image and have the title and summary to be overlayed on top of it. This can be done by using a bootstrap jumbotron.
<?php $backgroundImg = wp_get_attachment_image_src( get_post_thumbnail_id($post->ID), 'full' );?>

<div class="jumbotron" style = "background-image:url('<?php echo $backgroundImg[0]; ?>');">
  <div class ="container" style ="background-color: rgba(0, 0, 0, 0.7);">
	<div class ="row">
		<div class ="col-12 text-center">
			<h1 style = "color:white;">
				<?php the_title(); ?>
			</h1>
		</div>
		<div class ="col-12 text-center">
			<hr class="my-4" style = "color:white;">
		</div>
		<div class ="col-12 text-center" style = "color:white;">
			<?php the_content(); ?>
		</div>
	  </div>
  </div>
</div>
The first call we make is to get the featured image of the page, which means we never have to edit the code to update the image. I’ve also darkened the the container which allows the text to pop out from the image. This is what it looks like.

Stage 5: Getting Categories and Sub Categories:
This is the hardest part of the project. We have to somehow get the category to loop through from an element on the page. To make my life easier, I decided to use the category name projects, so that I could use the title to link to the category. Once I have that I could loop through the sub-categories of the parent category.
<div class = "container">
	<?php
        $title = get_the_title();
		$cat_id = get_cat_ID($title);

		$args = array('child_of' => $cat_id);
$categories = get_categories( $args );
foreach($categories as $category) {
?>
There is no point in putting in an image at this stage, and the code is pretty self explanatory.
Step 6: Build out the Carousel
The carousel is pretty easy to build. Its getting the post images in that is the more difficult part. Rather than trying to explain its easier to show the code.
<div class = "row">
		<div class = "col-12 text-center">
			<h3><?php echo $category->name ?></h3>
		</div>
	</div>
	<?php  $args = array(
		'posts_per_page'   => 50,
		'category'    => $category->term_id,
		'orderby'          => 'date',
		'order'            => 'DESC',
		);
	$posts_array = get_posts( $args );
	$str = preg_replace('/[^A-Za-z0-9]/', '', strtolower($category->name));
	?>

	<?php $active = "active" ?>
	<div class = "row">
		<div class = "col-12">
			<div id="<?php echo $str; ?>" class="carousel slide" data-ride="carousel" data-interval="false">

		  		<div class="carousel-inner">
			 		<?php foreach($posts_array as $post){ ?>
						<div class="carousel-item <?php echo $active; $active = ""; ?>">
			  				<img class="d-block w-100" src="<?php $image = wp_get_attachment_image_src( get_post_thumbnail_id( $post->ID ), 'full' ); echo $image[0]; ?>" style = "height:300px;">
			  				<div class="carousel-caption d-none d-md-block" style="background-color: rgba(0, 0, 0, 0.7);">
    							<h5 style="color:white;"><?php  echo $post->post_title; ?></h5>
    							<p style="color:white;"><?php  echo $post->post_excerpt; ?></p>
  							</div>
						</div>
					<?php } wp_reset_postdata(); ?>
		  		</div>
		  		<a class="carousel-control-prev" href="#<?php echo $str; ?>" role="button" data-slide="prev">
					<span class="carousel-control-prev-icon" aria-hidden="true"></span>
					<span class="sr-only">Previous</span>
		  		</a>
		  		<a class="carousel-control-next" href="#<?php echo $str; ?>" role="button" data-slide="next">
					<span class="carousel-control-next-icon" aria-hidden="true"></span>
					<span class="sr-only">Next</span>
		  		</a>
			</div>
		</div>
	</div>
   <div class="row">
		<div class = "col-12">
			<br>
		</div>
	</div>
<?php } ?>
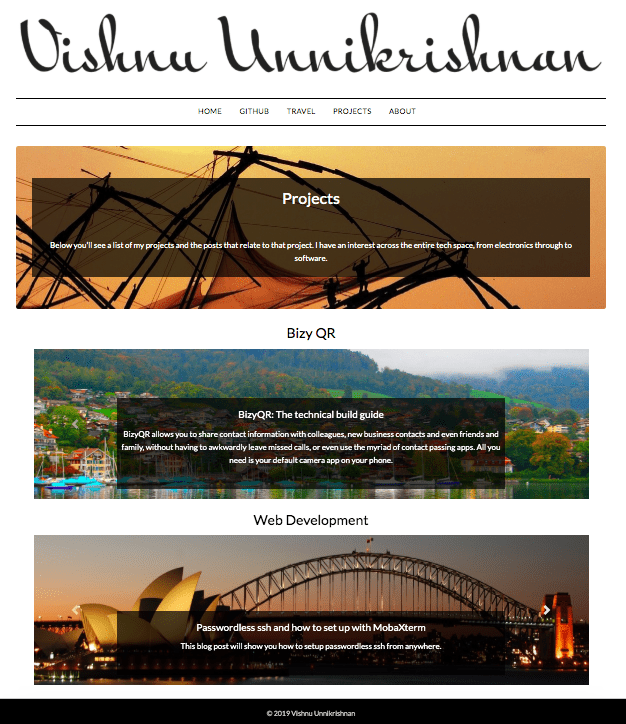
As you can see it’s quite long. Once we get the sub category we get all of the available posts. Then we get the title, featured image, and extract etc. If you have any questions feel free to ask in the comments section below. The advantage of doing it this way is that everything is automatic.
Step 7: WordPress Pages display
This is what it looks like. Click the project link here or at the the top of the blog to have a look at the interactive version. A static version can be seen below.

Conclusion
We set out to achieve three things.
- A page of posts sorted by sub-category
- It needs to update automatically
- The page needs to look nice
All of the above except arguably the third has been achieved and if you have questions don’t hesitate to ask. This has been one of my longest posts yet.
